Potato Battery? No Way!
- Science Fair Wiz

- Sep 22, 2018
- 3 min read
5th Grade Science Fair
Potato Battery
Oh no! We ran out of batteries. No worries everyone, because in this science fair project we will be creating a potato battery. That’s right, the potatoes we cook and eat can be used as a battery! In this project you are going to be using a potato battery to power a clock. We will be testing to see which arrangement of copper and zinc sticks will power the clock.
How does this work? Chemical reactions are creating electricity. Electricity is created by the movement of electrons. A perfect placement of the sticks and the wiring will cause a flow creating an electrical current. For your background research, gather information about how electrons flow and how chemical energy turn into electrical energy. I recommend watching an informative video on YouTube on how potato batteries work to get additional information.
In your science fair, you will be testing which combination of the stick materials will get the job done. You need to create your hypothesis first. To do this, think about which combination of sticks will do the job.
Now lets power a clock with potatoes.
Materials
1. 2 potatoes
2. 2 zinc sticks
3. 2 copper sticks
4. Wire (its white one from kit)
5. Low voltage LED clock (kit clock has red and black wire sticking out)
If you cannot get some of the materials easily, you can always purchase a kit for this project from Amazon from this link https://amzn.to/2Dm8VZr. The kit has all the materials needed for this experiment except for the 2 potatoes. As of now, the kit is selling for $10. I recommend getting the kit because everything for this project is easily there, but it can still be done by getting individual materials.

Procedure
1. Label the potatoes #1 and #2, place next to each other with #1 on left and #2 on right (leave a gap)
2. Put clock in front of the potatoes, on the right of it a red wire should poke out and on the left a black wire
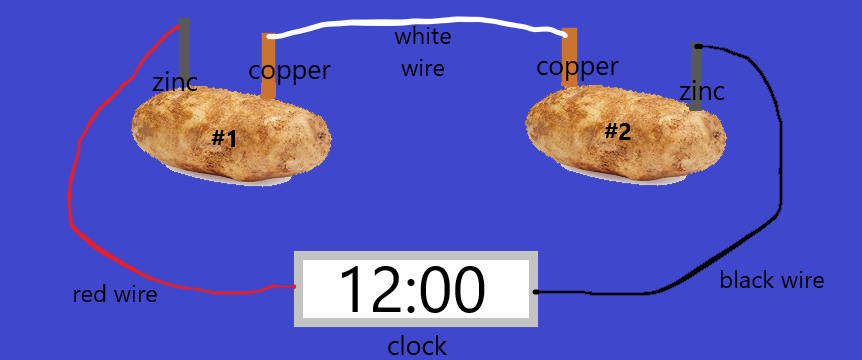
3. Make combinations, each combination should have a different arrangement of the copper and zinc stick’s placement, and make sure there is always 2 sticks on each potato. (An example of one combination: on the first potato put a zinc stick on the left and copper on the right. Then on the second potato put a copper stick on the left and a zinc stick on the right. Refer to the blue model for clarification)
4. On each combination, the wiring structure should always be the same. The right stick on potato one and left stick on potato 2 should be joined by a white wire. (For example: Connect (by tying) the white wire from copper in potato one to copper in potato two. Refer to the blue model for clarification)
5. Always tie the red wire to the stick on the left side of potato 1(For example: red wire to zinc in potato 1; in blue model)
6. Always tie the black wire to the stick on the right side of potato 2 (For example: black wire to zinc in potato 2; in blue model)
7. Record your data by labeling each combination set 1,2,3 and so on. Be sure to record what appeared on the clock on each time

-This is how one combination could look like (starting on left) zinc copper copper zinc.
-Keep on testing different combinations and recording them as your data. Each combination should have a different arrangement of the copper and zinc stick’s placement
-Combinations can be like these below:
(Cu is copper and Zn is zinc)
1. (Zn,Cu);(Cu,Zn) used in blue model
2. (Cu,Zn);(Zn,Cu)
3. (Zn,Cu);(Zn,Cu)
4. (Cu, Zn);(Cu,Zn)
5. (Cu, Cu); (Zn,Zn)
I recommend taking pictures each time of every combination’s results.
Conclusion
Which combination of zinc and copper sticks’ arrangements did you think would power the clock? Was that hypothesis proven correct or incorrect by your data collection?


Comments