How To Make a 3D Animal Cell Model Science Project
- Science Fair Wiz

- Jun 3, 2018
- 5 min read
Updated: Jun 30, 2018
After your teacher goes over the chapter on living things and cells, he/she most likely will ask you to do a project to show what you learned in class. It might scare you the first time you hear when he/she says to make a 3D model of an animal’s cell but trust me it isn’t as hard as you might think, that is if you follow my step by step guide on how to create a 3D animal cell model based on my middle school project experience which I got an A+ on.
The first thing to consider is the different organelles (structures) in an animal’s cell. Remember that just because both animal and plant cells are eukaryotic, they aren’t nessarily the same and in fact have many differences. So if your teacher assigned you to do an animal cell model, make sure you know how it looks.
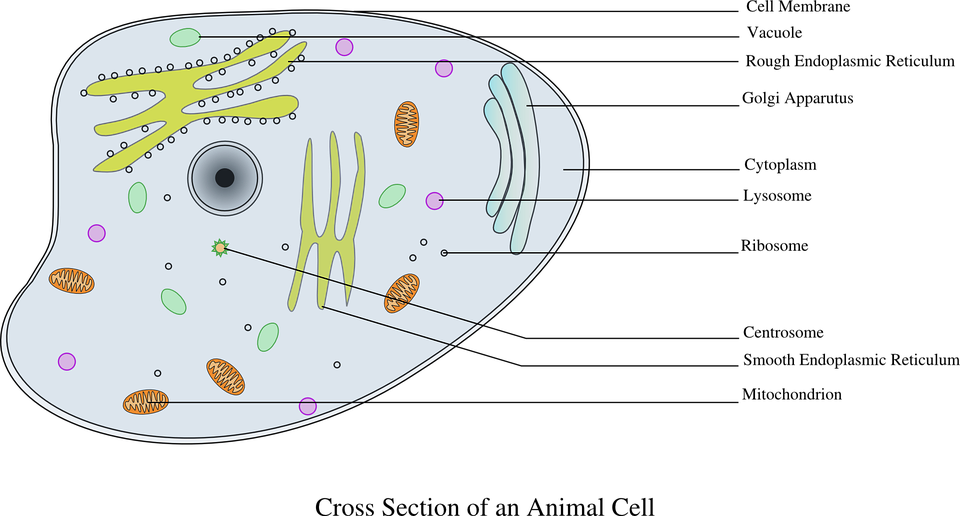
For the inside of the cell include whatever the teacher has required you. You will most likely need to represent a nucleus, cell membrane, ribosomes, cytoplasm, rough and smooth endoplasmic reticulum, golgi apparatus, vacuoles, lysosomes, nucleolus, and mitochondria. I’ll briefly go over how a typical 3D animal cell model should look.
The Cell Itself

Styrofoam ball can be bought from Amazon
We will be making the cell model using a 10 inch in circumference Styrofoam ball. This will be perfect for modeling the cell. You can also spray paint the ball and make it colorful. My partner who I did this science project with simply painted it yellow with acrylic paint, it depends on whatever supplies you have on you.
We want the ball to represent an animal cell, so the outside will be considered the cell membrane. You can get even more creative and make dots with some metallic sharpie to represent a porous cell membrane, since its job includes allowing certain molecules to enter and exit.
Next, we need to slice out one-fourth of the ball. This way we can represent the inside of the animal cell with all its organelles. I recommend also painting the inside once you cut out the ball. Fabric or foam paper could also be used as a background.
The Organelles

Model clay can be bought from Amazon https://amzn.to/2kLq8zB
I personally think the best part in making this animal cell model project is making the organelles. When I did this project my partner and I used play dough, but I recommend using modeling clay because it doesn’t have cracks like play dough does when it dries out.
Also, make sure to use a variety of colors for your organelles, and stick to the same color scheme per organelle. So for example, if you use orange and yellow clay for your mitochondria, use the same colors for all the mitochondrias you make but try not to repeat yellow and orange for the rest of your other organelles like ribosomes, nucleus, golgi apparatus, etc.
Make sure to add the bigger organelles to the model first, then the smaller ones at the end.
NUCLEUS AND NUCLEOLUS: For the nucleus, add a small foam ball in the middle and carve in some space for a rolled up clay representing the nucleolus. Or you could model both the nucleus and nucleolus by balling up clay. Just make sure the nucleus is round, in the middle, and large enough to represent the control center of the cell. The nucleolus, also round, should be dded within or on top of it.
MITOCHONDRIA: Flatten out some clay or playdough and curve the edges in order to make an oval shape, similar to the shape of a peanut. Then with another color clay, roll it slim like a snake then go over the peanut figure in a zig zag pattern, kind of like adding mustard on a hot dog. You might want to glue the zig zag line on top for it to stick using a hot glue gun.
Instead of adding a clay piece as a zig zag, you could leave the peanut figure as it is and carve a zigzag into it, the carving tool is included with the clay I recommended from Amazon.
Another idea is to stick a rubber band in playdough, but if you really want to make sure your project doesn’t fall apart and look neat then I suggest gluing on a zig zag of clay/playdough like I mentioned before.
I suggest making only 2 mitochondria in all.
RIBOSOMES: Simply ball up very tiny pieces of clay and add it throughout the inside of the cell. Anything you could use that’s small and circular could represent a ribosome, you could get creative and use items like rhinestones or cotton balls. I’d suggest 10 to 20 ribosomes if your using a foam ball that’s at least 10”. You could randomly place them throughout the cell and make mini clusters of them.
LYSOSOMES: Same process as making ribosomes, except the pieces are a little bit bigger. I’d suggest 3 lysosomes in total.
VACUOLES: It’s the same process, vacuoles are larger than both ribosomes and lysosomes and are irregular oval- shaped. In the end, make sure the ribosomes are the small circles, the lysosomes are the circles a little big larger, and the vacuoles are circular/oval-shaped and are larger than lysosomes.
ROUGH & SMOOTH ENDOPLASMIC RETICULUM: Get some clay and roll it flat. Now start making a long rectangular flat snake that’s about half an inch wide and 7 inches long, depending on how big you’re making your model. Then start going back and forth with your snake creating a wide zig zag. Make sure your zig zag isn’t edgy and is round around the corners. Every you’re your going back and forth with the snake, have the middle sections close to each other. So every time you cross the clay it looks like your making a bow shape.
Another tip is to get pipe cleaners and make the same style zig zag with those.
For the rough endoplasmic reticulum, you need to add the ribosomes on top of the zig zag. For the smooth endoplasmic reticulum, leave it as is. You could either make one long zig zag, half dotted and half left as is, or you can make two separate zig zags one with dots one without. I recommend using the same clay color for the zig zag if you’re doing two separate ERs. Make sure both the ERs are placed near each other. The ERs should be near the nucleus as well.
GOLGI APPARATUS: You can do the same technique as the ER for the Golgi Apparatus. What I’d recommend is rolling up chubby snakes and placing it on the foam ball in a way that it looks like the wifi symbol.
CYTOPLASM: When you’re all done making the organelles and placing it in the ¼ of the foam ball we cut out, everything else in the inside of the cell counts as the cytoplasm.


Comments